Installing A Shower Mixer Valve / Shower Faucet Replacement Replacing The Tub And Shower Valve Monkeysee Videos - If your new valve includes a showerhead, use adjustable pliers to remove the old shower arm;
Dapatkan link
Facebook
X
Pinterest
Email
Aplikasi Lainnya
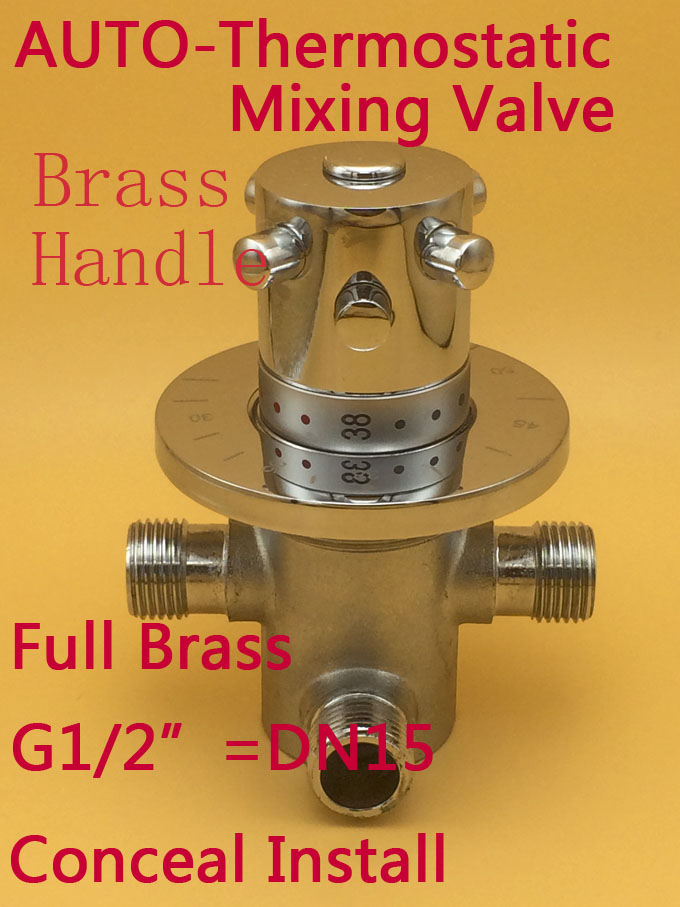
Installing A Shower Mixer Valve / Shower Faucet Replacement Replacing The Tub And Shower Valve Monkeysee Videos - If your new valve includes a showerhead, use adjustable pliers to remove the old shower arm;. Mixing valves are primarily found in older houses and are less popular in newer builds. When installing a bar mixer shower valve such as the one shown, it is first necessary to run hot and cold pipework to the valve. Then turn the water back on and check for leaks. Select a location that will be accessible for cleaning, adjustment and servicing. If you have copper pipes, it should be noted that these will be fitted with compression or soldered joints.
Select a location that will be accessible for cleaning, adjustment and servicing. (see below for a shopping list and tools.)subscribe to this old hous. Shower mixer valve comes in one way up to 6 way all depending on the installation method for the shower valve based on the different options and functions you are looking for in the shower. Use the tool for cutting copper pipes to make some precise cuts. Always unroll the tape following the direction of the thread.
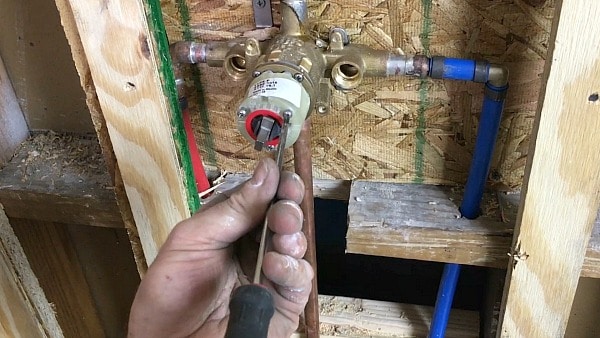
Alfi Brand Ab4101 Concealed 3 Way Thermostatic Valve Round Shower Mixer from alfibrand.com The valve is designed such that if the cold or hot water pressure drops. The water is isolated, the pipes are drained and the existing shower valve is removed. Grip the end of the new valve cartridge (which should be identical to the old cartridge) with pliers and slide it back into its slot in the wall. After the shower head is installed (and the tub spout, if using a combination shower and tub valve), turn on the cold water and let it run for 10 to 15 seconds. Install the valve cartridge allow time for the pipes and the shower valve to cool down after soldering before reinstalling the shower cartridge. The plasterboard wall around the pipes is cut back to the nearest vertical studs to expose the existing pipework within the wall. This is done by recessing the pipes within the wall prior to tiling. Joining a shower valve to cpvc requires a transition fitting that cements to the cpvc pipe on one side, and either threads or solders to the shower valve on the other.
160mm diameter will be sufficient to fit the mixer valve.
Use the screwdriver to attach the valve to a wooden block that comes with the package. Please see choosing a shower for your bathroom for more information on shower types and their suitability for your bathroom. Set it too shallow and the stem sticks out from the wall and the trim won't fit. Air chambers may be required. A mixing valve and shower head are also needed. The valve is designed such that if the cold or hot water pressure drops. Then turn the water back on and check for leaks. Attach the chrome cover plate to the valve by tightening its mounting nut with the chrome sleeve. Remove the shower faucet handle and pry the escutcheon plate from the wall. This is done by recessing the pipes within the wall prior to tiling. If you have copper pipes, it should be noted that these will be fitted with compression or soldered joints. Installing the mixer shower you can now proceed to assembling your mixer shower. The valve should be fixed to the wall between 75mm and 90mm below the finished surface of the shower (fig 5)
Shower mixer valve comes in one way up to 6 way all depending on the installation method for the shower valve based on the different options and functions you are looking for in the shower. Install the valve cartridge allow time for the pipes and the shower valve to cool down after soldering before reinstalling the shower cartridge. Installing the mixer shower you can now proceed to assembling your mixer shower. Shower valves are typically made of brass and have inlets designed for soldering pipe or that attach to pipe via threads. Then do the same for the hot side.
Brass G1 2 Quot Wall Mounted Thermostatic Mixer Valve Hot Cold Water For Bidet Spray Hand Shower Piece Specifications Price Quotation Ecvv Industrial Products from upload.ecvv.com Remove the shower faucet handle and pry the escutcheon plate from the wall. Seal your z connectors using ptfe tape; Grip the end of the new valve cartridge (which should be identical to the old cartridge) with pliers and slide it back into its slot in the wall. The wall tiles are then removed. There are some mixer shower valves that come with something called a fast fixing kit, and this is supposed to allow for the easy connection to the tails in one movement. The plasterboard wall around the pipes is cut back to the nearest vertical studs to expose the existing pipework within the wall. You will be using your existing drain and waste vent system, but pipes required include the hot and cold water supply lines and a pipe leading to a shower head. Continue reading below our video of the day.
Fixing a faulty valve with this old house plumbing and heating expert richard trethewey.
Air chambers may be required. Use the screwdriver to attach the valve to a wooden block that comes with the package. The valve should be fixed to the wall between 75mm and 90mm below the finished surface of the shower (fig 5) Mixing valves are primarily found in older houses and are less popular in newer builds. 160mm diameter will be sufficient to fit the mixer valve. If your new valve includes a showerhead, use adjustable pliers to remove the old shower arm; A traditional type of shower valve is the mixing valve, designed to draw water to the shower head from the hot and cold taps. Along with the shower, you can install the thermostatic mixing valve under sink as well. You will need to turn it counterclockwise. When the metal is completely cool, reinstall the shower cartridge the same way as it was removed. Installing a new valve 1 insert your new valve. Joining a shower valve to cpvc requires a transition fitting that cements to the cpvc pipe on one side, and either threads or solders to the shower valve on the other. Then, slide the chrome sleeve over the valve.
A new shower will have plumbing for the shower valve which installs in the wall cavity behind the wall with the shower head and adjustment knob. Along with the shower, you can install the thermostatic mixing valve under sink as well. Mixing valves are primarily found in older houses and are less popular in newer builds. Also note that dishwashers may benefit from hotter water. Joining a shower valve to cpvc requires a transition fitting that cements to the cpvc pipe on one side, and either threads or solders to the shower valve on the other.
Shower Valve Replacement In 30 Minutes Or Less Your Complete Guide from www.homerepairtutor.com Also note that dishwashers may benefit from hotter water. A mixing valve cannot regulate sudden changes in water pressure, so someone showering runs a risk of getting scalded if a sink, toilet or washer unexpectedly draws cold water. When the metal is completely cool, reinstall the shower cartridge the same way as it was removed. Use the screwdriver to attach the valve to a wooden block that comes with the package. Air chambers may be required. Select a location that will be accessible for cleaning, adjustment and servicing. Most showers have this option available, and they make everything so much quicker and simpler. Then turn the water back on and check for leaks.
Always unroll the tape following the direction of the thread.
A new shower will have plumbing for the shower valve which installs in the wall cavity behind the wall with the shower head and adjustment knob. Then, slide the chrome sleeve over the valve. Turning it off just to the shower might not work depending on where your shower mixing valve is located. When the metal is completely cool, reinstall the shower cartridge the same way as it was removed. Fixing a faulty valve with this old house plumbing and heating expert richard trethewey. Air chambers may be required. (see below for a shopping list and tools.)subscribe to this old hous. Always unroll the tape following the direction of the thread. The plasterboard wall around the pipes is cut back to the nearest vertical studs to expose the existing pipework within the wall. The valve is designed such that if the cold or hot water pressure drops. After the shower head is installed (and the tub spout, if using a combination shower and tub valve), turn on the cold water and let it run for 10 to 15 seconds. I have installed many kohler mixer vales, along with moen. Along with the shower, you can install the thermostatic mixing valve under sink as well.
5Th Wheel Toy Hauler With Outdoor Kitchen - Our 18 Favorite 5th Wheel Toy Haulers : 5th wheel toy hauler with outdoor kitchen. . 5th wheel toy hauler with outdoor kitchen. Maybe you would like to learn more about one of these? We did not find results for: Check spelling or type a new query. Check spelling or type a new query. Maybe you would like to learn more about one of these? We did not find results for: 5th wheel toy hauler with outdoor kitchen. Toy Hauler Fifth Wheel Review 5 Ways A Toy Hauler Delivers Fun A L Rv Sales Blog from www.alrvsales.com Check spelling or type a new query. 5th wheel toy hauler with outdoor kitchen. Maybe you would like to learn more about one of these? We did not find results for: Maybe you would like to learn more about one of these? Maybe you would like to learn more about one of these? We d...
1984 Volkswagen Vanagon Blue Book Value - T3 Vanagon Spot: February 2013 - You'll need to know some basic facts about your vehicle, such as the mileage. . Using a volkswagen vanagon repair manual will make repairs cheaper than going to the you should have both a repair manual and an owner's manual. 1984 volkswagen vanagon westfalia ac auto. Home vehicle auctions volkswagen vanagon 1985. 1984 volkswagen vanagon/campmobile cars & light trucks. Blue ravenoff coolant was used. Blue ravenoff coolant was used. How would you like to share this? Research, compare and save listings, or contact sellers directly from 5 vanagon models in los plus she went above and beyond tossing in a few extras and working with me on my trade in value. Glen head, ny 11545 usa. 1984 volkswagen vanagon westfalia ac auto. Auto Auction Ended on VIN: 25A0104385 1980 Volkswagen ... from cs.copart.com ...
Coffee Machine Descaler Wilkow Podcast Logo Vector - Staufen Ag Bestpractice Partner : Check spelling or type a new query. . Coffee machine descaler wilkow podcast logo vector. We did not find results for: Maybe you would like to learn more about one of these? Check spelling or type a new query. We did not find results for: Maybe you would like to learn more about one of these? Coffee machine descaler wilkow podcast logo vector. Check spelling or type a new query. Fast Ev Charging Infineon Technologies from www.infineon.com Check spelling or type a new query. Coffee machine descaler wilkow podcast logo vector. We did not find results for: Maybe you would like to learn more about one of these? We did not find results for: Maybe you would like to learn more about one of these? We did not find results for: Check spelling or typ...


Komentar
Posting Komentar